Monday, March 10, 2014

The Painted Lady ~ A Dresser Update


Hello there peeps...
I know, I've been neglectful and haven't been around.

I think I have a brain cloud.
Ever have one?
Know the best way to get rid of it?
Hrrmph.


Anyway...
last weekend it was cold and snowy...
again...
but it made for the perfect weekend to get this project done...
finally.

Last fall I told you about this fabulous find I got for my living room.
And yes, it's taken me this long to get it painted.
Whatever.


I apologize to those of you who said I should leave it natural and not paint it.
I just couldn't.
I say I'm sorry, but really I'm not.


It was throwing my whole living room atmosphere right outta wack!
Okay, maybe it wasn't quite that dramatic, but it all felt off.
Like something just wasn't quite right, you know?
It's bad enough that I am forbidden to paint the grandfather clock.


I would probably get a lecture from my dad just for mentioning it. :\
{but just between you and me, my mom thinks it would look pretty good painted black!}
The grandfather clock, that is.  But don't tell.


I waffled some on the color.
I have a shelf done in Annie Sloan Old White,
so I didn't want this to be the same.
Between four different choices, I went with the AS Cream.


It's kinda buttery yellow.  But I like it.
If I had thought about it, mixing the Old White and
Cream might have been a good compromise.


I wiped the dresser down with some hot soapy water.
It is old and was kinda dusty and cob-webby.
Two coats of paint later, you'd never even know!


I did some light distressing with a sanding sponge.
I didn't want to go crazy, just kind of a gently used look.
I know you're supposed to wax THEN sand, but I don't like it that way.
Call me a rebel.


I have yet to decide if I will use any dark wax for aging.
I may try it on a small space and take it back off if I don't like it.


The knobs may change. 
That's something else I can't decide on.
I thought about painting them aqua, then didn't.


Some cute crystal ones might be fun.
At some point two of the knobs had been replaced,
they aren't quite the same style and size as the others.


But, unless you look, you can't really tell...
so for now...if you don't care, I don't care.


I love the lightness it brings to that side of the room now.
It really does fit into the rest of the style I have going on.
And as pretty as the natural wood was...I just love this more!


And now...just in case you're curious about the stuff on top:
this chunky plant stand...yes, it's a plant stand...
came from Hobby Lobby a few years ago.
I have used it for a cake display and now for candles
They have them again this year, but they are several dollars more now, of course.


The Pottery Barn look-alike lantern came from Pier 1 for a fraction of the cost of PB's version.
The frame is a clearance find, painted, strung with wire and mini clothespins.
The paper wreath came from Zulily and the round tray from Decor Steals.
The urn came from a vintage street fair and the boxwood ball is a TJMaxx find.
Like I said...just in case you wanted to know.


Oh...and...it's not just a pretty face...
I use it to store rotational decor, extra candles, books, and such.
It's awesome.

You know...if I had a wide angle lens...
I'd someday show you the WHOLE living room.
Oh well.

I hope you have enjoyed this makeover.
And if you didn't, please keep it to yourself. :)

I'm trying hard to get over my brain cloud problem...
and in the meantime...
I think I'm finally going to start painting the bathroom.
I've only had the paint for a year.
Ha!

I hope you all have a fantastic week and
the brain clouds stay far far away from you!


Sharing here:

Thursday, February 20, 2014

Gluten Free Chocolate Cupcakes with Peanut Butter Frosting

Howdy, howdy!
I told you I had sweet treats in store for you!

Remember once I told you I had a friend with gluten issues?
Well, it was his birthday recently...
and we were headed to their house for Bible study...
and I couldn't very well show up empty handed, now could I?

So...I took some of these babies...and we all chowed down!


They're dark and moist.
Chocolatey and peanut buttery and oh so utterly...
good.


Actually, if you want to know the real truth...
while the cupcakes were pretty good...
I threatened to lick the frosting off of every last one...


Seriously...it was THAT good!
Oh my...I could eat it all day long with a spoon!
Or at least until I made myself sick.


It was the first time I'd made a peanut butter buttercream
and I can tell you...it certainly won't be the last!
The cupcakes were good, but the frosting makes all the difference!


Gluten Free Chocolate Cupcakes
  • 1 1/2 cups GF All Purpose Baking Flour {from Bob's Red Mill}
  • 2 tbsp corn starch
  • 1 cup brown sugar
  • 1/2 cup white sugar
  • 1/2 cup PLUS 2 tsp unsweetened cocoa powder
  • 1 tbsp baking powder
  • 1 tsp xanthan gum
  • 3/4 tsp sea salt
  • 1/3 cup butter, softened at room temp.
  • 1/4 cup vegetable oil
  • 1 large egg
  • 1 tsp pure vanilla
  • 1 cup warm brewed coffee
  • 1 tsp cider vinegar
  • 1/2 cup mini chocolate chips
  1. Preheat oven to 325°F. Place cupcake liners into muffin tins...you'll need 24.
  2. Mix all dry ingredients together in a large bowl. 
  3. Add butter, oil, egg, and vanilla. Mix until the batter has a crumbly texture.
  4.  Slowly add coffee and vinegar.  Beat at medium speed for 2 minutes.
  5. Fold in chocolate chips.
  6. Fill cupcake liners about 1/2 to 2/3 full...you really should get 24. :)
  7. Bake for about 20 minutes...until they spring back when gently touched.
  8. Remove from oven and cool completely on a rack
{This is basically the recipe from Bob's...
I added the chocolate chips because...well, why not?
And I adjusted the temp and baking time for cupcakes.}


Peanut Butter Buttercream Frosting
  • 1 cup {2 sticks} butter, softened at room temp.
  • 1 cup creamy peanut butter
  • 1 tsp pure vanilla
  • 3-4 cups powdered sugar
  1. Cream butter until smooth.  Add vanilla and peanut butter and beat until creamy.
  2. Add 2 cups of powdered sugar, then gradually add more until you reach your desired consistency.
If you want to be able to pipe it, make sure it's firm enough to hold up. 
Use a large open star tip and swirl it on.
Sprinkle some extra mini chocolate chips on top for extra goodness.


My friend was thrilled!
He doesn't get home made GF goodies very often.
I think he may have swooned a little. :)

I took the extras to work and everyone loved them there, too!
{especially the frosting...hee hee}

We've gotten a little reprieve from winter around here for a few days.
It's been sooooo nice!
I hope the same is true for you guys
and that you have a fantastic weekend!

Very soon, I hope to be able to show you what
we did to our old TV entertainment center.
You wouldn't even  recognize it!
Until then...


Handing out spoons {for frosting!} here:

Thursday, February 13, 2014

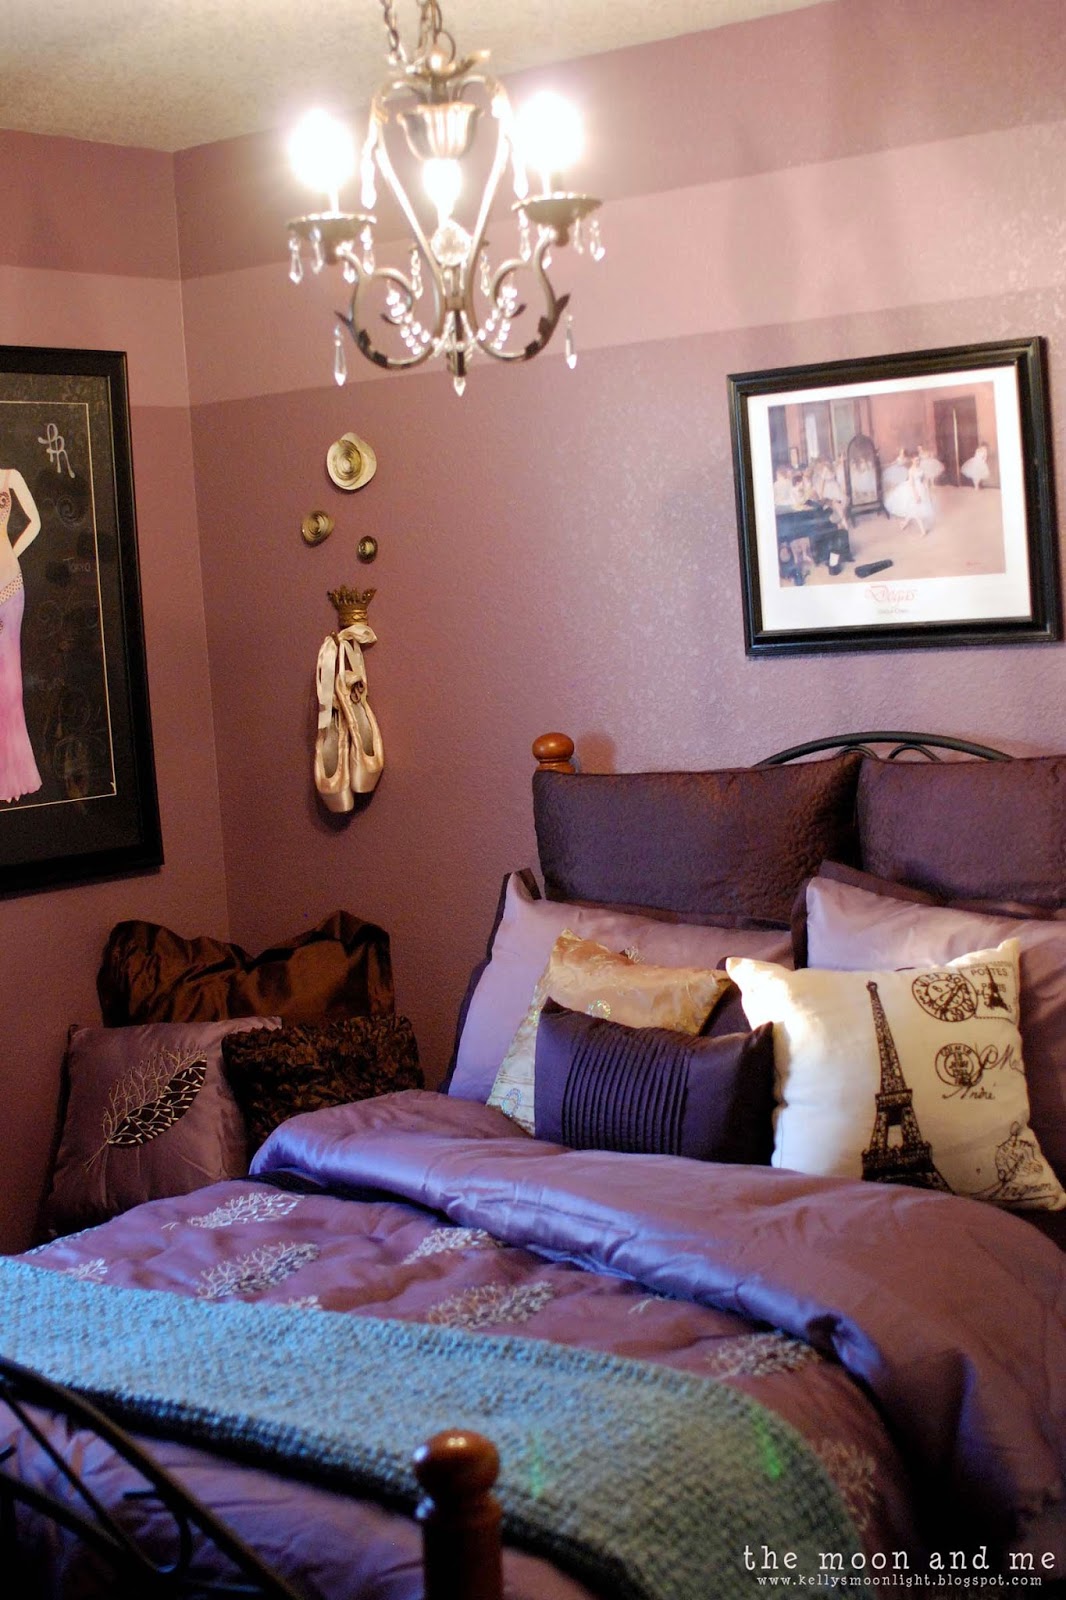
Sara's Purple Palace ~ The Secret Project


I know you've been waiting with
bated breath for this day!!!

The day I tell you all about the secret project I mentioned here...
and somewhere else but I don't know where...

Sara's room makeover!!!
{be warned...this is a looooong post}


 I know she's only home part of the year...
but we wanted her to have her very own space where
she could hang out in luxury...so to speak. :)

And...it needed to be vastly different from her "high school ~ dance trophy" room.

This is how it started out...


Nothing special...just lots of stuff...
Dance trophies and plaques and awards...and nutcrackers...and more stuff...
It was time for a change.


I knew I wanted the walls to have a little interest...but not too much.
So I went with a single wide stripe.
I chose the width and location specifically so it would "wrap"
around the window, door, and closet and not be below them...if you get my drift.

I measured down from the ceiling for the top, then added
the width I wanted and marked the bottom of the stripe.


I thought it would be much easier to do the stripe first
since it was the lighter of the two, rather than try to
put the lighter coat over the dark...ya know?

Then we used a laser level to put the tape up...
one of us would hold the level while the other placed the tape.
It worked great! But it is definitely a two-person job.


I would love to tell you that stripe was perfect, but I'd be a liar.
It was perfectly straight...but because our walls are deeply textured,
I still had to do some touch ups even with the tape.  C'est la vie.


I know what you're thinking...
PURPLE...
ugh...

It has absolutely no connection Pantone's so-called "color of the year,"
The girl just happens to loooooove plum.


The darker color is Sherwin Williams "Soulmate"
It truly is...it's gorgeous!
and the lighter is the same, lightened 50%
{truth be told, though...I think Soulmate is on the same
color card with SW's color of the year, Expressive Plum}


Now on to bunches of pictures...


Here are the jewelry displays I made...
I ended up turning the frame landscape
because it worked better in the space this way.


This little antique dresser/lingerie chest I picked up for a reasonable price.
The color was perfect and the knobs were cute...
all I did was paint the insides of the drawers.
I do believe that this actually IS the Expressive Plum.


Found this awesome bench/ottoman on clearance at a local store.
It called to me and sang hallelujah.
Plummy and paisley? I'll take it!
I painted the legs with some chalk paint to make it coordinate.


Throw on some fluffy pillows and you might have a reading corner.


The nutcrackers stayed...but they got some better digs...
I would have been in a lot of trouble if they had gone bye-bye.


The chandelier is so fabulous in here.
It took a while to find the perfect one...
I didn't want it to be too big or too small.


This one came from Home Depot and I love it.
The afternoon sun sends little rainbow prisms all across the walls.


There was a little concern that it would be too much purple.
So, I left the bed and dresser natural and used some chocolate brown pillows.
The closet and trim I left cream to lighten it up and tie in with the lingerie chest.


Sara had picked up several paint sample cards a while back and they
were surprisingly close to some of the color codes in my plan book.
There were plums, browns, creams and some natural colors.
That's where my inspiration came from...the girl herself.


I threw in a couple pops of aqua for interest.


This Degas print and the one above the bed she already had.
I just updated the frame by painting it black.


The bedding I got at a super price from BB&B...really!
The aqua sheets came from Ikea.


I had been searching high and low for a lamp for the bedside...
the day before she was coming home for Christmas break
I went to Hobby Lobby and found this one.
It was meant to be!  The cream fabric rose?
Shut up...and the finish is almost exactly like how I did the jewelry holder.


Her first pointe shoes have always hung on the wall in a special place,
so I knew I had to make a statement with them.

The painting on the far wall is actually Sara's own artwork.
I was so excited to put it here on display in her room.


I just realized I did not take a picture of the
window and the new curtains.
Oh well.


She had ABSOLUTELY NO IDEA that
we were doing this for her.

I made sure I was up when she and Jon got home that morning for break.
I walked up the stairs with her and when she turned on the light,
I thought she was going to fall over.
She was so stinking excited, she was jumping up and down.
Of course, that just made me cry.


I knew she would like it, I just didn't realize how much she really needed it.
She likes it so much she made her bed
every.single.day. she was home for Christmas break!
That was convincing. :)

No more little girl stuff here...
now it's a palatial space fit for a princess...mine.


Have a fabulous weekend and come by
in a few days for some sweet treats!


Sharing here:

Friday, February 7, 2014

Valentine's Cold Hard Cash Giveaway!

Update: This Giveaway has ended...

Enter to win $200 to spoil your sweetie (or yourself!) this Valentine's day!
I have teamed up with 15 other amazing bloggers to share
some love with you in the form of  cold hard cash money!
The winner will be chosen at random and paid via Paypal,
so you must have a Paypal account to receive the prize.

Anyonita Nibbles is a food blog obsessed with providing
recipes for flavorful food, like these triple chocolate eclairs.

 Dizzy Busy & Hungry provides easy, healthy, family-friendly food!

Natasha from 1 Epic Mommy is a lifestyle blogger sharing stories as a
single mom and advice to other single moms, including the infamous
How to Deal with Your Baby Daddy. Also, she shares blog hops,
reviews, giveaways, and much more! 

The Brunette Baker is home to a range of tasty desserts and sweets!

Kelly is a feisty redhead with paint under her nails and flour on her face.
Check out her ramblings about DIY, recipes, and home decor at The Moon and Me.

40eighteen is all about home and family and making
life a celebration! Make yourself at home!

Elizabeth is a food blogger at Food Ramblings where she
creates delicious but easy and low-cost recipes and
tries to put everything in a crescent roll.

Diane blogs about Simple Living, Seasonal Eating with the

Sarah of Sarah Cooks the Books lives in California and cooks her way
through her massive cookbook collection, sometimes coming across recipes
to add to her permanent collection, like this impossibly good chicken and greens.

Nicole from 365ish pins is a Pinterest pin-tester discovering what
works and what doesn't, like How to Clean your Slow Cooker.

Natasha from Serenity You blogs about recipes, kids play ideas, crafts etc.
Her most recent craft was these lovely Twig Stars.

Christine from Foody Schmoody shares shortcuts to recipes ranging from
something as easy as Turkey Sloppy Joes to dishes that require a bit more
finesse such as Roasted Butternut Squash and Chicken Risotto

Pickled Okra is a fun blog that is 2/3 creative patterns and tutorials,
and 1/3 amazing and easy recipes like my "Loch Ness Monster" free
sewing pattern or my "Simply Amazing Toffee" recipe.

One TIPsy Chick is a place you will find simple time saving tricks, tips and
recipes like Peanut Butter Ice Cream and Vanilla Brown Sugar Scrub.

Mommy on Demand likes to focus and quick and healthy meals the
entire family will enjoy, like these Chicken Pillows!

Get your fill of cooking, crafting and gardening in the
North Maine woods with The Wilderness Wife.


Are you ready to win some money? Enter below!
Increase your chances of winning, come back each day and pin an
image to have your name entered 10 more times in the giveaway!


 Good luck!