Wednesday, May 29, 2013

Rockledge Country Inn ~ Our 20th Anniversary

Twenty years ago, I married my best friend.
Boy do I feel old.

One of our groomsmen is missing from this photo...
he was kinda the odd one.
We were just a bunch of punk kids.
And look at all that hair!


We celebrated by spending a long weekend here:
The Rockledge Country Inn bed and breakfast in Manitou Springs, Colorado


See how it backs up against Pike's Peak?
The old track for the Manitou Incline is visible on the right,
nowadays it full of hikers instead of trains.
  

It is a craftsman style house and such a gorgeous
place I wanted to share it with all of you!
I think I took too many pictures!


The house was built in 1912 and this 2-story copper
fireplace was the only source of heat then.


I was told they would draw the heavy velvet drapes on the doors
in this room so all the heat would go to the upstairs where all the bedrooms are.
  

Thankfully that's not needed anymore...especially in May.


I loved these arched windows in the French
doors leading out to the patio in the back.
 

This is in the solarium...it's used as an office now and
I didn't want to get shots of their desk space.

The house was originally built by a millionaire from Kansas who came
to Manitou for the healing powers of the sun for a child who had tuberculosis...
hence the need for the solarium.


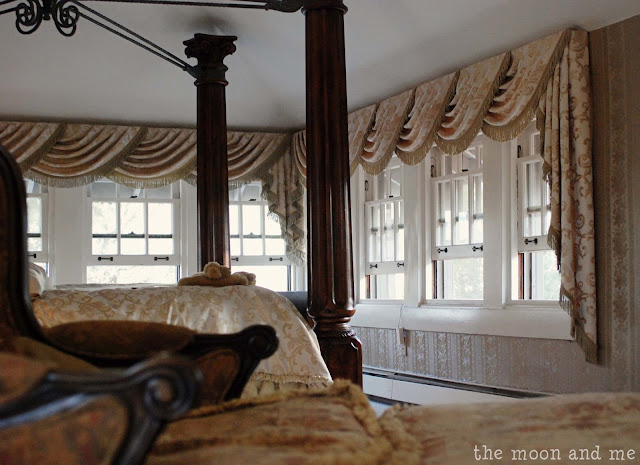
Moving up to our room...the Spindletop.


A beautiful English Country room named for a Texas oil
gusher that started the oil industry in the U.S.
 

It took up one wing...so we had windows on 3 sides.
Awesome windows.
 

And look at the door casings and moulding!
*eek!*


There was even a jacuzzi for 2!
These are the windows in the jacuzzi room.


There are 8 suites, but the only other one I'm sharing is El Ocaso...The Sunset.
This room is French Country.
 

But what I really loved...was the bathroom in this room:
 

Doesn't it make you drool?
 

Okay, enough of that,
let's go outside...
 

There's an outdoor hot tub which we spent some time in.
Some very nice walking trails that were originally created in 1939.


The windows on the right are part of the solarium.
Top middle, is the massive chimney from that fabulous fireplace.


Ugh...just look at these carriage house doors...


We had such a wonderful weekend here.  It was very restful and fun.
Breakfast was served every morning and it was delicious.
One morning we ate in the keeping room off the kitchen...loved it.
 

We took a stroll up on the walking trails to see this gorgeous view.
  

This is NOT a sponsored post in any way.
We thoroughly enjoyed our visit and wanted to share it.
I firmly believe in promoting great local businesses and attractions.
 
This particular location is adults only.
There are two other manor houses under the same ownership,
they welcome kids and are within walking distance.
Everyone comes to this house for breakfast.
   

If you are ever in the Colorado Springs/Manitou Springs area...
you should check them out.
Absolutely wonderful staff, very friendly.
You will love it.
 

And don't forget to visit Garden of the Gods!

I hope you enjoyed your virtual stay as much as we enjoyed our real one!
Here's to many more years with my hubby. :)

What's been your favorite place to celebrate?

 
Sharing Here:


Friday, May 24, 2013

Overnight Blueberry French Toast


Ugh...I had the awfulest {is that a word?} time
getting decent pictures of this stooopid recipe.

But it was simply too good NOT to share!

Now, granted, it is overNIGHT French toast...
so the first pictures were taken AT NIGHT in my dark kitchen...


Good stuff here, folks!
Eggs, real maple syrup...cream, vanilla, cream cheese...
and blueberries!!!


I made this for a brunch party.
Big hit.

And seriously...making in the night before?
Genius.

You can stagger to the kitchen the next morning half asleep
and pop it in the oven without too much brain strain!
And you'll be rewarded with a delicious breakfast.


Overnight Blueberry French Toast
adapted from allrecipes.com

French Toast:
  • 12 slices day old french bread, cut into 1-inch cubes {I used some gluten free baguettes}
  • 2 - 8 oz. pkgs cream cheese, cut into 1-inch cubes
  • 1 cup {or more} fresh blueberries
  • 12 eggs, beaten
  • 2 cups half and half {you could also just use milk}
  • 1 tbsp pure vanilla
  • 1/3 cup real maple syrup
 Coulis:
  • 1 cup white sugar
  • 2 tbsps cornstarch
  • 1 cup water
  • 1 cup fresh blueberries
  • 1 tbsp butter
  1. Lightly grease, butter or Pam a 9X13 baking dish. Arrange half the bread cubes in the pan...top with cream cheese cubes.  Sprinkle 1 cup or so fresh blueberries over the cream cheese...top with remaining bread cubes.
  2. In a large bowl, mix the beaten eggs, half and half, vanilla, and maple syrup.  Pour over the bread mixture.  Cover and refrigerate overnight.
  3. Remove the pan from the fridge about 30 minutes before baking so it's not super cold.
  4. Preheat oven to 350°F.
  5. Cover with foil and bake 30 minutes.  Uncover and continue baking 25-30 minutes until center is firm and toast is lightly browned.
  6. While it's baking...make the sauce...or coulis: in a saucepan, mix the sugar, cornstarch, and water.  Bring to a boil.
  7. Stirring constantly, cook 3 to 4 minutes. Mix in the remaining 1 cup blueberries. Reduce heat and simmer for 10 minutes, until the blueberries burst. {I had to help them with this. :)}
  8. Stir in the butter, pour over the baked French toast.
Printable Recipe

You know...since this is a long weekend...
I think it's the perfect time for you to try this out!

Wouldn't it be soooo good with blackberries?
Or a berry medley?

Maybe a little whipped cream?

Oh man, I think it must be getting close to lunch time.
:)

Have a fabulous holiday weekend!


Friday, May 17, 2013

Pink Poker Night ~ Girls' Night In

Looking for a fabulously fun night with all your BFFs?
Host a pink poker night!

A couple of weeks ago we had a girls' night in at my house.
I decided to do pink poker night cuz it sounded fun.

Not that I'm a great card player.
On the contrary...I just make up the rules. :)


I found this kit on Amazon.
But you don't need it...just find some pink poker chips and cards.
Bicycle brand has several pink card versions.
I got these chips on Ebay.

Don't forget all the frills...
tiaras and feather boas are a must!
Make sure everyone gets in the spirit!

The box kit included invitations, but those would be simple to make.
It also suggested having everyone bring one fun item
to make up a "bling" pot for the last hand.
You could make it whatever you wanted.


Oh, and if you just happen to have some pink
spray painted folding chairs, be sure to use 'em!


Striped straws...don't they make you smile?
I actually found these in the party aisle at Hobby Lobby for about $3.
Oh, that's where the tiaras came from, too.


Of course you need some fabulous finger food...

Below are some peanut butter pretzels
drizzled with pink white chocolate.
Does that even make sense?


We had some pink sangria, but I was having so much
fun, I forgot to take any pictures of that...or of
anyone enjoying the party for that matter.

Oh well...I guess having fun was the bigger priority. :)


The sangria was delicious and easy!
1 - 2 liter bottle of 7up Zero
1 - bottle white zinfandel
1 - bottle white cranberry strawberry juice
sliced oranges to float in the pitcher
All chilled and mixed together
SoOoOo yummy and refreshing!

Even if your sister dumps a whole glass on her chair...
and doesn't at least use a straw to suck up what she can.


Oh, look...there's one cookie left for me.

My mom showed up with these beautiful roses.
Love her. :)


We had all sorts of other finger foods, some store bought.
No need to tire yourself out getting ready!

You need to save your energy for all the laughing
and carrying on that's sure to happen.
{shrimp cocktail is easy and hey, it's PINK!}
I'm also thinking...watermelon,
strawberries, pink lemonade...


It was so much fun and definitely what everyone needed.
A whole night of just us girls with a whole bunch
of laughing and goofy shenanigans!
But I have one little confession to make...

We never actually got around to playing poker!
We were having too much fun NOT playing.
:)
The next day I got texts or emails from everyone
thanking me for such a fun night!
I said next time, we won't even pretend we're gonna play.

Does this sound like a great time to you?
Check out the Pink Poker Night Pinterest board I started.

 If you host a pink party, send me pics...
since I forgot to take my own.
Ha!


Saturday, May 11, 2013

How To Build A Chunky Salvage Style Shelf


Or how NOT to build one.

You know how over in my sidebar it says
I like to make stuff up as I go along?
Yeah...well, sometimes that doesn't work out so well for me.

However, in this case it all turned out okay in the end.
Thank heaven.


When I started making changes to the living room I knew
I was going to want something different on the wall by the front door.
Something a little more substantial than the little shelf I already had there.
Something I created with MY OWN HANDS!!! Bwahahaha.

Sorry...I got a little Frankenstein-y there for a minute. :)

Anyway...I began searching for inspiration.
I found a great one here at AKA Design.
So I set off to make my own, slightly smaller version.
And I didn't want to follow their directions.
Because I didn't that's why.

This...is my story.


First I decided how wide and tall I wanted the piece to be.
Then we set about cutting some wood.

I knew I wanted the corners mitered so they'd all be neat,
so I had the hubby help me cut some boards
before he headed out of town for business.

Some of them were too wide for the miter saw and I
DO NOT like to use the table saw alone.


Since I didn't plan to use many nails...I cut some little
pieces to glue into the inner corners for support.

This section on the left...its inner support piece is shorter because the
smaller piece was *supposed* to fit inside the larger piece.

But *someone* didn't measure correctly and thus the
"making things up as I go along" thing really had to come into play.


You'll see later just how I "fixed" this problem.
Which I knew that I knew wouldn't really be a problem
once I put the molding on the front anyway.
Meh.


I glued everything with Gorilla wood glue...because it's awesome.
Truly.

The back of my shelf is open...there is a small 1X3 piece at the top for stability,
but I didn't make the "boxes" you see in the inspiration post.


Here's a back view so you can see the support piece and bottom.


You can see here where I added a couple of those little
support pieces to hold the bottom part to the top part.

Like I said...then it has a piece of small molding on the front...
it's really sturdy, it's not going to fall apart any time soon.
Unless I throw it down the basement stairs,
but really, why would I do that?


Here's what we've got folks:
1 - 1X8 for the top shelf {actually measures 7"}
1 - 1X6 for the top section front and sides
1 - 1X4 for the bottom section front and sides
 1 - 1X3 for the back support
1 - 1X4 for the bottom bottom, you know.
Some upside down baseboard molding, some cove molding,
and some stray pieces of what I believe are
furring strips I found in the corner of the garage. :) 


I only bought 4 foot boards because they were
easier for me to haul around by myself.
Of course, the molding doesn't come in short pieces,
so that's another story.


I filled all the seams with DryDex spackle.
I thought it might help with my impatience.
Nope.

But it sands soooo smooth. :)


One thing I did do the same...used a sample pot of chocolate
brown paint I had hanging around for my base coat.

My other furniture is black, but I didn't want that harsh of a contrast.


Then I wasted some time adding a little grey here and there.
I say wasted because, in the end...I don't think you can even tell it's there.
The whole thing got some Annie Sloan Old White and distressed.

Here's a lesson learned: chalk paint and
old crackle medium do NOT like each other.
Just so you know.
Oh well.


Ignore my unmanicured pinkish hand...and gaze
upon the hooks I had planned on using.


But Jon, in his infinite wisdom, said to me:
You're not gonna like that.

But why? I picked them and I want to use them so there!
Fine, but they're gonna stick out from the wall and you're not gonna like it.

Fine.

SO, since he IS awesome...
he suggested doing keyhole hangers.
He even routered them for me. :)
  

See how he just made a nice little cutout in the wood?
We decided the vertical piece would be stronger for supporting the shelf.


We actually made the whole a little deeper in the middle since
the screws we used were slightly domed and needed a little more space.

Here you see the finished keyhole hanger.
And yes, now it hangs flush against the wall.
Sweet.

{If you look closely, you can see how the cove molding helps
hold the bottom and top pieces together.  See? I wasn't worried.}
  

We used a laser level to make sure we hung it straight...
at this point it's already hung...he's just using the level now so he can gloat. :)


And thar she be!
Oh, it's missing something you say?


Okay...how's this?


Oh, I forgot...I used some Minwax paste wax over the paint.
Love it.


While at first I was mad at myself for messing up the paint with the
crackle goop, it actually kinda added to the salvage look I was going for.

Like something that had been repainted several times on top of old chipped paint.
Perfect.


Now it's home to some fun things, like my number 3 sign, a rooster,
a canvas of one of Sara's senior pics, a plaster mold of her hand when she
was 5, and one of many stars you find sprinkled throughout the house.


Like my number 3?
I got that from Antique Farm House.
Jon says: why 3?
I said: because we're 3.
No, we're 2 now.
NO...we will ALWAYS be 3.
:)


The finished shelf is 30 1/2 inches wide,
about 7 inches deep and 10 1/2 inches tall.


Chunky.
Chunky's good, right?
That's what I tell myself anyway.

Does it speak architectural salvage to you, too?


Sharing piles of sawdust here: