Or if not your kitchen, your KitchenAid?
Well, step right up ladies and gents...
see the AMAZING, OUT OF THIS WORLD
the KNOCK YOUR SOCKS OFF
Mixer Makeover Kit.
Yours today for the low low low low price of...
just kidding. :)
SPRAY PAINT TO THE RESCUE!
As much as I would LOOOOOVE a new mixer...
mine still works great and I can't bring myself to
shell out the moolah for a new one.
Some time ago I had stuck some vinyl on it
to help with it's appearance...it didn't do much.
And it was a PAIN to get it off!
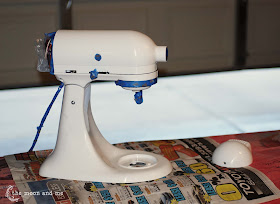
But, once that was taken care of, I took of the parts that would detach.
The bowl holder, the back cover and the silver band.
Clean the heck out of it.
This stuff works great!
I hadn't realized just how dirty this baby was.
I would wipe it down but there was gunk in all the crevices.
I must have spilled vanilla on it once or twice...it was all sticky behind the band.
Blech.
And then...I think it was cleaner than when I got it!
{I swear this pic didn't look blurry in the camera!}
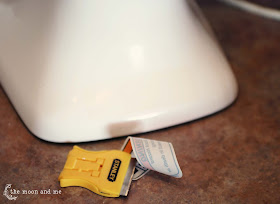
Then take the sticker off the back. I used a widget thingy.
But I still couldn't get it all.
See here? The words are still there in some magical "forever" glue.
I had to break out the big guns to get that goo off!
Then I just wiped that area off again with the Krud Kutter.
I lightly sanded all over where I would paint.
Just use a sponge sander.
Use some painter's tape to cover up all the parts that should NOT be painted.
I used a zipper baggie over the motor and tape to secure it.
Make sure you get that little accessory hole on the front!
Yippee! Here we go!
One coat of primer...then...
She was so pretty after that first coat of black...I almost left it like this.
But, alas, I didn't.
Should have.
Major curses and grumbles ensued.
After the black...I used some vinyl circles I mentioned here.
Smoothed them out all over...
and STILL didn't get them perfect!
Ugh.
The red leaked under some of them...
and the spray paint made the vinyl super soft.
It was a nightmare to take off.
So I had to do some touch up.
Even with the grumbles...I am glad I went ahead with the dots.
A solid color would be pretty...
but it wouldn't have the same character.

I am SOOOO in love with this mixer.
We've spent some quality time together recently
and it might just be "the one."
:)
If you had your choice of colors...
brand new or DIY...
what would your mixer look like?
Sharing here:
At The Picket Fence
Tatertots and Jello
Fox Hollow Cottage
Serenity You
I Heart Naptime Sundae Scoop
I Should Be Mopping the Floor
The Dedicated House
DebbieDoo's
WTFab
Thrifty Decor Chick
My Uncommon Slice of Suburbia
Savvy Southern Style
Stone Gable
The 36th Avenue
Beneath My Heart
Thrifty Decor Chick
Living Well Spending Less
Glitter Glue and Paint
Wonderful at Home
If you had your choice of colors...
brand new or DIY...
what would your mixer look like?
©Kelly
Sharing here:
At The Picket Fence
Tatertots and Jello
Fox Hollow Cottage
Serenity You
I Heart Naptime Sundae Scoop
I Should Be Mopping the Floor
The Dedicated House
DebbieDoo's
WTFab
Thrifty Decor Chick
My Uncommon Slice of Suburbia
Savvy Southern Style
Stone Gable
The 36th Avenue
Beneath My Heart
Thrifty Decor Chick
Living Well Spending Less
Glitter Glue and Paint
Wonderful at Home


Oh- Kelly- How cute! It reminds me of a lady bug---very very cute! Did you spray paint IN your kitchen? I think you should take in orders for redos for these things! xo Diana
ReplyDeleteIt is a great make-over. I love the red and black, very cute!
ReplyDeleteYou are a genius!!! And a brave genius at that! LOVE that makeover. My KitchenAid is a blood red, the color I waited oh-so-long to find (at a good price) and finally did. I put it in the cart and then pushed it around the store for about a half hour, trying to talk myself out of spending the money. At long last, common sense reigned and I realized that I might not get this chance again. SO, I have the deep red one...but now...you've got me thinking...hmmmm... ♥
ReplyDeleteWow, you are so creative!
ReplyDeleteI just got my stand mixer for Christmas last year, and I don't think I would have the guts to paint it. Mine is also the red one, and I love the lady bug dots on yours! But I'm too chicken to spray paint it... I'd mess it up and then never forgive myself, then feel guilty every time I used it. LOL.
I agree with Diana's comment above - you should start a stand mixer re-do business! Yours looks simply amazing!
Lovely blog! I'm co-hosting WTFab bloghop this week! Found you there :) Remember to follow all the co-hosts:)
ReplyDeleteAnd... I'm your newest follower!
Kisses from Poland :*
http://voguerka.blogspot.com
I would have never thought of spray painting a kitchen gadget! Your lady bug like mixer is so cute! Thank you for visiting my blog :)
ReplyDeleteThat is awesome! I love it!!!! Thanks for stopping by my blog! Love yours...I added you to my list! Cheers! Nicole
ReplyDeleteSome people have custom paint jobs on their cars... you have a fabulous custom painted mixer! What an original!!!! You were very brave to take it apart! Thanks for the tips about the Krud Kutter and Desolve It!
ReplyDeleteGreat post, Kelly!
Please join us for TUTORIALS TIPS AND TIDBITS, my weekly linky party. Your project would be perfect to share! Linky goes live tonight (Wednesday) at 8:00 pm. Hope to see you there!
That looks fantastic!!! I love it black, but I don't think I'd have the guts to leave it that way :) I think I'd go for deep dark red, and maybe do a swirly stencil on it :) thanks for sharing!! Found you at TT&T
ReplyDelete~April
Dimplesanddelights.blogspot.com
Fabulous work! Love the polka dots one!Thanks so much for sharing the great tutorial! I'd love for you to visit my blog.
ReplyDeleteHappy week!
Hugs from Portugal,
Ana Love Craft
www.lovecraft2012.blogspot.com
It's adorable in spite of your troubles Kelly. Thanks for sharing.
ReplyDeleteOK this is AWESOME. What a great idea! For some reason I never thought of doing this. I'm going to have to make big plans for my mixer, LOL.
ReplyDeleteOh my gosh, this transformation is AMAZING!! You did a wonderful job on it! I love the red with black dots! Thanks for linking up to Thrifty Thursday!
ReplyDeleteKelly, I love your mixer transformation. It looks amazing and brand new. Great job!!
ReplyDeleteThank you for linking up to Throwback Thursday!
xoxo
Denyse
I have to admit, I've never thought of updating my white kitchenaid. I didn't know it could be done. Yours is adorable. Can you come do mine? :)
ReplyDeleteThanks for linking up at Throwback Thursday!
What a great idea! I've wanting a new one also, but don't want to spend the money when I have one that works fine. Thanks for the idea. Found you through Serenity Saturday!
ReplyDeleteOr if not your kitchen, your KitchenAid? Well, step right up ladies ... akitchenaid.blogspot.com
ReplyDeleteAny suggestions for a glue/adhesive to add Swarovski crystals to my stand mixer??? I just got a pink Artisan for my birthday and am determined to bling it out! I tried my trusty E6000 glue...it's not working...peels right off. Any suggestions??
ReplyDeleteThis is great idea for some reason.This is really helpful for kitchen and it's one of the best kitchenaid product.
ReplyDeleteThis comment has been removed by the author.
ReplyDeleteHi, Kelly, You are a Great!! What a awesome idea you share with all us. I am surprised to know that how to change a color of KitchenAid Mixer.Thank you so much.
ReplyDeleteLove the idea of painting your KitchenAid Mixer. I keep mine in the garage as it is "urine yellow"! Not even a happy shade of yellow! I would like to try your idea of paining it but wonder what type of spray paint you used on your appliance. Again, thanks for the tip!
ReplyDelete